

CRAFTS
While being quarantined, we have had to become pretty resourceful when it comes to crafting materials... but I’m not complaining. It has actually been fun for a change to think of fun and festive holiday crafts to do with the kiddos using only what we have on hand! Today, I am sharing these easy to make, Easter wands. My kiddos have loved running around the house with them and even playing puppet show with the bunny wands. Below I will add a list of all materials we went with, but keep in mind, if you don’t have all of this on hand, get creative with what you do have! Let the kids have some fun and draw their own shapes, use ribbon instead of yarn, or even paint on cardboard instead of paper... happy crafting!
Materials Used:
1. Paper Straws
2. Watercolor Paper
3. Yarn
4. Hot Glue (to attach paper to wand)
5. Glitter & Glue
6. Watercolor Paint
How To Make:
1. Start by free hand drawing your desired shapes onto your watercolor paper.
2. Get creative and paint your shapes as desired with watercolor paint.
3. After letting dry, cut out your shapes.
4. Next, add a little glue and some glitter for embellishment.
5. Attach your shapes to the paper straws using hot glue.
6. Add desired yarn or ribbon.
Don’t forget to check back again tomorrow for another daily busy box activity!


Don’t forget to check back again tomorrow for another daily busy box activity!

MONDAY’S BUSY BOX: Paper Plate Easter Baskets
Welcome to the kick off of our daily busy box activities! Today, we are sharing this super simple craft, perfect for all ages. All you need are 4 supplies... so let’s get started!
WHAT YOU NEED:
• (2) Plain Paper Plates
• Scissors
• Paint + Brushes
• Hot Glue Gun + Hot Glue
• Optional: Yarn, Ribbon, Basket Filler
HOW TO:
1. Start by painting the back sides of your plates
2. Once paint is dry, flip the plate to the inside and
draw a straight line across the middle of the plate
3. Cut along the straight line and semi circle of both plates
4. Once both plates are cut, line up both plates face to face to match
5. Hot glue the rims of the plates together
6. Optional: Make a Pom Pom, add ribbon or basket filler
After your baskets are finished, decorate a few paper Easter eggs and slip them inside!
Check back tomorrow for another fun and festive craft...


Are you at a loss for how to keep your little ones entertained while schools are closed?
Each week we will be sharing daily activities to keep those little hands busy so they don’t completely destroy the rest of your house! We know that this time can be challenging, and money is tight. Our mission is to create activities using products you already have around your home. We are all in this together and will get through it one day at a time... our hope is that these ideas will spark creativity and will allow for some much needed quiet and bonding time while also being fun!
Each Sunday, we will post our daily activities for the upcoming week so that you have time to plan your boxes. In all, we have 5 boxes (one for each day, Monday - Friday). Each one labeled with the day and pre-planned materials in each box for that day’s activity. Easy for grab and go crafting!
We will walk you through each day’s activity and all that you will need, but feel free to get creative and if you don’t have a supply on our list, use what you do have around the house.
THIS WEEK’S ACTIVITIES
Monday: Paper Plate Easter Baskets
Tuesday: Easy To Make Easter Wands
Wednesday: Watercolor Egg Garland
Thursday: Printable Easter Crafts
Friday: Faux Egg Decorating + Berry Basket
Check back daily for the full tutorial and a list of supplies needed for each project!


The holiday season is fast approaching and while some may not want to see the sight of anything Christmas until their Thanksgiving turkey is cleared off of their table, I will apologize in advance, because this is just the first Christmas project of many to come in the weeks ahead!
I was fortunate enough to collaborate with the lovely ladies of THE HOMESTEAD HAVEN for this post. Amanda & Renee create these adorable SHIPLAP MINI SIGNS, and when it arrived on my doorstep I couldn't wait to get to work on a little wreath to adorn it with.

I am a sucker for some cute packaging, and loved how they packaged
their product with attention to detail and their logo attached.
HERE IS WHAT YOU WILL NEED:
- 1 mini embroidery hoop
- linen ribbon
- Christmas greenery
- floral wire
- hot glue gun
- hot glue sticks
- twine
- sicssors
- wire cutters
- letter stamps
- stamp ink pad

1. Start by laying out all of your supplies.

2. With most faux greenery garland that you get, you can pluck the greenery right off of the plastic stem. This saves you from having to cut or waste. Remove approximately three to five pieces of greenery off of the stem for your wreath.


3. Once your greenery is ready, cut approximately five to six inches of wire.

4. Place your greenery on the embroidery hoop where you desire it and then begin wrapping the floral wire around the greenery and the embroidery hoop beginning at the base of your greenery and working upwards.


5. Wrap the floral wire about 2/3rds of the way up your greenery piece, leaving the top portion to flow naturally.

6. Take your smaller pieces of greenery and hot glue them on the opposite side of the hoop as well as on top of where the floral wire is showing.


7. Cut your ribbon two to three inches longer than each side of your hoop. This will give you enough allowance to center the wording on the ribbon properly inside of the hoop once you are completed stamping.
8. Pick out the letters that you desire for the word(s) that you would like to spell out and hand stamp them onto your ribbon.

9. Lastly, place your ribbon inside of the embroidery hoop
and pull tightly on the ribbon as you are closing up the hoop.
(TIP: I actually recommend adding the ribbon into the hoop as your FIRST step. I chose to not show the ribbon added in my first posts so that you could see the step by step details clearly.)

10. Add twine and tie around the hanger placed on the back of the SHIPLAP SIGN.

That's it! A super simple project while the kiddos are napping or at night while watching your favorite show with a glass of hot chocolate (or wine)...


I just love this little shiplap sign so much and love how versatile it is year round! Keep a look out for more seasonal mini wreath tutorials that I plan to make, which means, YOU NEED ONE OF THESE SIGNS to put them on! And just for all of you loyal followers, the ladies at THE HOMESTEAD HAVEN are offering you a 15% Discount on THIS SHIPLAP MINI SIGN ONLY. Using the code SIMPLYCIANI15 at checkout.
(*coupon expires November 11th)

I love switching out my decor each season & think that changing out pillow covers is the easiest way to bring a whole new feel into your living room. But with pillow covers being so expensive it can get costly to change them (as I stated in my last pillow case tutorial). When figuring out an easy way to cover my large pillows, I decided to go with an easy sew pocket pillow cover. It takes only one yard of fabric and only requires 3 straight lines of sewing.

I found the wording inspiration for this pillow from Jennifer @ Dear Lillie - The Blog.
Keep in mind: I am no way by any means trying to copy her ideas to sell or re-distribute. I simply just loved the pillow and the verse & wanted to re-create one for my own home & used her beautiful creation for inspiration :)
Kate @ Centsational Girl has a wonderful tutorial on how to sew this easy pocket pillow cover. You can find her tutorial [HERE]
To make the pillow cover, I used one yard of leftover linen fabric from my Halloween banners.
I then measured my pillow from top to bottom. Instead of cutting the fabric (as stated in the tutorial from Centsational Girl) and then sewing, I simply folded the fabric over to the exact measurements of the front of the pillow, leaving the two flaps to overlap in the back. I trimmed the fabric in the back to slightly overlap each other, then hemmed the edge that would show on the outside of the pillowcase. Next, sew down the sides of the pillowcase 1/4 inch in from the edge & turn the pillowcase inside out & then you are done!
After the pillowcase was sewn together, I typed up the wording in my design program, printed it out then placed it inside the pillowcase once it was turned right side out. Because I used linen fabric, you could see the wording right through the fabric. I traced over the wording with a fabric pen, then using regular craft paint, I painted in the words.


There you have it! A simple way to spruce up your pillows!

October is finally here & Halloween decorating is in full swing in our household, which means that most days you will find me at the kitchen table crafting away on some new seasonal decor project ;)
The past week I have been busy working on tons of new things to share, so within the next few days I will be bombarding the blog by uploading all of the DIY projects I have been slaving over!
For now, here is a great idea to bring some seasonal spirit into your home that is quick on time & as always fits within budget! Not all of us have hundreds of dollars to spend on seasonal decorations, pillows, etc... to make our homes feel warm and festive as we go from summer to the cool crisp days of autumn. One of the ways to easily change up your space as the seasons come and go, is to switch out the pillow covers. As we all know, pillows can become costly, especially when you are changing them out each season. Even if you are buying them at Wal-Mart, you can still end up spending $9-$12 for one pillow. My Solution: make a pillow cover yourself to slip over the pillows that you already have! You don't need to be experienced at sewing, all you need to know is how to sew a straight line & you are good to go.

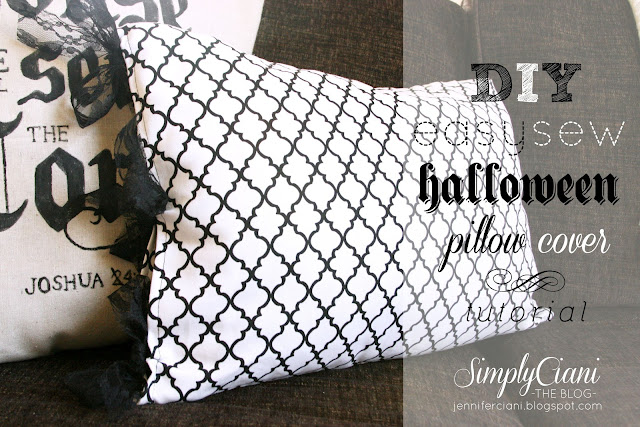
DIY Halloween Pillow Cover:
1. Start by measuring your existing pillow, length and width
2. Cut your desired fabric to size, adding on a 1/2 inch to each side
3. On each piece of fabric, turn the end edge inward, 1/4 of an inch & sew.
(This finishes off the end of the pillow. Do this to each piece of fabric)
4. Put each side of fabric together, facing each other inward
5. Sew the two pieces together 1/4 inch in from the edges
6. Only sew 3 sides, leaving the 4th side open


After you have the pillow sewn together, stitch on the ribbon of your choice to each side.
This will keep the pillow closed


& that's it, you're done!!
The fabric that I chose was a remnant fabric left over from a previous project.
Overall this pillow probably cost me ONLY $3!


Shabby Chic Chair Makeover:
Here the chair is before, which was covered in a plain white floral fabric

I was at JoAnn's Fabric over the weekend and scored this printed burlap for 1/2 off
(Little Hint: Burlap is on sale all through October)
I love the burlap & think it gives the chair a finished look!


Make sure to check back TOMORROW for another tutorial on:
Vintage Book Page Wreath

Subscribe to:
Posts (Atom)


